
Term 2 | Level 2 | Phonics focus: adding -ing, -ed, -er and -est: drop the e, double the letter, y to i
Lesson 4 – Plants and Growing | Lessons – Index
Lessons
This page has the two viewing and presenting lessons of Lesson 4, Plants and Growing: Lessons 4.7 and 4.8. The Lesson 4 page has the Lesson 4 overview, the Lesson 4 review and the PDF download.
Select a lesson to go straight to it. Each lesson ends with a link back to the top of the page.
Lesson 4.7: Read a Life Cycle Diagram
Visual | About 20 minutes
Term 2 | Level 2
Goal
“I can read a life cycle diagram by following the arrows, explain why it is a circle, and use it to write an explanation.”
Words to know
life cycle, diagram, stage, label, arrow, cycle
Wonder
Think about this question before you start. Say your ideas. You will come back to it at the end of the lesson.
Why does a plant’s life go round in a circle?
Let’s Learn
A life cycle diagram shows the stages a living thing goes through as it grows.
- Each stage has a picture and a label.
- Arrows show the order. Follow them from one stage to the next.
- It is drawn as a circle, not a line, because it never ends. The last stage makes new seeds, and each seed can start the cycle again.
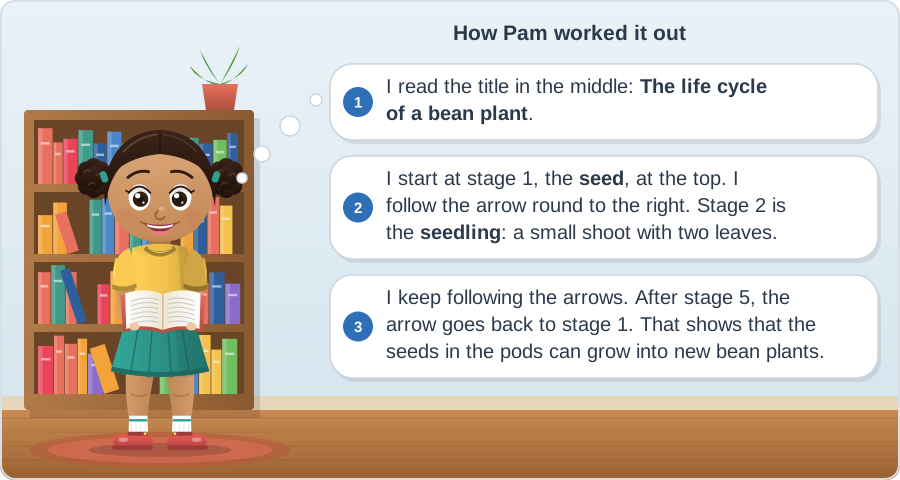
A diagram can show in one picture what would take many sentences to explain. Read the title first, then start at stage 1 and follow the arrows.
See How It’s Done
Use the diagram in Time To Practise.
Now Try It
Use the diagram in Time To Practise.
1. Which stage comes straight after the young plant?
Hint: Find the young plant and follow its arrow.
2. How many stages are there in this life cycle?
Hint: Count the numbered stages.
Time To Practise
Name: ______________________
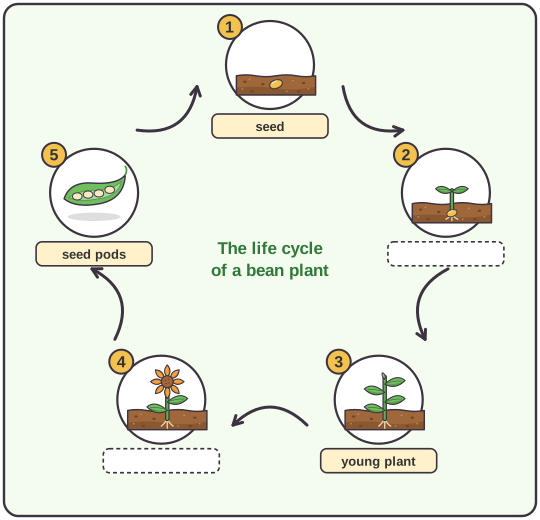
1. Read the life cycle diagram.

a) What is stage 3 called? ______________________________
b) Which stage comes before the flowering plant? ______________________________
c) In which stage do new seeds appear? ______________________________
d) Why is a life cycle drawn as a circle and not a straight line?
__________________________________________________________________
e) Use Lesson 4.1. What does a plant need between stage 1 and stage 2 to start growing?
__________________________________________________________________
2. Fill in the missing labels.
Two labels are missing. Write them in the dashed boxes.
3. Explain the life cycle.
Write four sentences that explain the life cycle of a bean plant. Use first, next, then and finally.
__________________________________________________________________
__________________________________________________________________
__________________________________________________________________
__________________________________________________________________
Reflect
Think about these questions. Talk about them with someone at home or at school.
1. Go back to the Wonder question: “Why does a plant’s life go round in a circle?” What do you think now?
2. I was a thinker today when I ______________________________.
A thinker thinks carefully to work things out. For example: I was a thinker today when I followed the arrows to explain the bean’s life cycle.
Take action: Look for different stages of plants in a park or garden: seeds, seedlings, flowers and seed pods. Which stages can you find?
Next Steps
If this was easy, try: Draw the life cycle of another living thing, such as a frog or a butterfly, with pictures, labels and arrows.
If this was hard, go back to: Task 1. Point to each stage in order with an adult and say its name before you answer the questions.
Notes for Parents and Teachers
Show notes for parents and teachers
These notes cover this lesson only. How every lesson runs is explained in How to Use This Material.
Let’s Learn
Trace the circle of arrows in Time To Practise with your finger.
See How It’s Done
Follow the arrows on the diagram with your finger as you go through Pam’s thoughts.
Answer Key
Reveal Answers
Now Try It
1. The flowering plant
2. Five
1. Read the diagram
a) young plant
b) young plant
c) stage 5, seed pods
d) Because it never ends. The seeds from the pods grow into new plants, so the cycle starts again.
e) water, air and warmth
2. Missing labels
Stage 2: seedling
Stage 4: flowering plant
3. Explain
Sample answer: First, a seed takes in water and starts to grow. Next, a seedling pushes up through the soil. Then it grows into a young plant, and later it makes flowers. Finally, seed pods grow, and the new seeds can start the cycle again.
Look for: the stages in the right order and all four time words.
Reflect
2. Any real moment from the lesson that shows the learner was a thinker. Examples: “I was a thinker today when I followed the arrows to explain the bean’s life cycle.” “I was a thinker today when I explained why a life cycle is drawn as a circle.”
Lesson 4.8: Draw a Labelled Plant Diagram
Visual | About 20 minutes
Term 2 | Level 2
Goal
“I can label the parts of a plant on a diagram with neat label lines, write captions that say what each part does, and draw my own diagram.”
Words to know
diagram, label, label line, caption, root, stem
Wonder
Think about this question before you start. Say your ideas. You will come back to it at the end of the lesson.
How can one drawing teach someone the parts of a plant?
Let’s Learn
A labelled diagram is a drawing that names the parts of something.
- Draw clearly, but simply. A diagram is for information, so you do not need lots of colour or background.
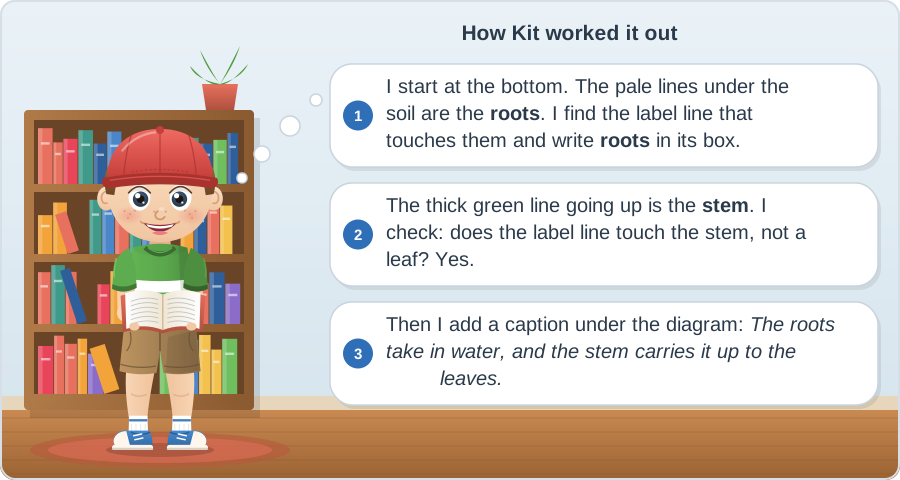
- Draw a straight label line from each part to its label. The line should touch the part.
- Write labels neatly, all on the same side if you can, so they are easy to read.
- Add a caption to tell the reader something more, such as what a part does.
| Part | What it does |
|---|---|
| root | holds the plant in the soil and takes in water |
| stem | holds the plant up and carries water to the leaves |
| leaf | uses sunlight to make food for the plant |
| flower | attracts insects and makes seeds |
| seed | can grow into a new plant |
See How It’s Done
Use the diagram in Time To Practise.
Now Try It
1. Which part of a plant makes food using sunlight?
Hint: Look at the table in Let’s Learn.
2. Why should a label line touch the part it names?
Hint: Think about a part that is close to another part.
Time To Practise
Name: ______________________
1. Label the diagram.
Write these labels in the boxes: flower, leaf, stem, roots, seed pod.
Hint: Follow each label line to the part it touches.
2. Write a caption for each part.
Write what each part does, in a full sentence.
roots: ______________________________________________
stem: ______________________________________________
leaf: ______________________________________________
flower: ______________________________________________
seed pod: ______________________________________________
3. Draw and label a real plant.
Look closely at a real plant at home or outside. Draw it as a diagram. Add at least four labels with label lines, and one caption.
Caption: ______________________________________________
Check your work. Tick each one you did.
☐ a clear, simple drawing ☐ four or more labels ☐ straight label lines that touch the parts ☐ neat labels ☐ a caption
Reflect
Think about these questions. Talk about them with someone at home or at school.
1. Go back to the Wonder question: “How can one drawing teach someone the parts of a plant?” What do you think now?
2. I was a communicator today when I ______________________________.
A communicator shares ideas clearly by talking, writing or drawing. For example: I was a communicator today when I drew label lines that touched the right parts.
Take action: Put your plant diagram next to the real plant. Can someone at home find each part using only your diagram?
Next Steps
If this was easy, try: Draw and label a cut-open fruit, such as an apple, showing the skin, flesh, core and seeds. Add a caption for each part.
If this was hard, go back to: Task 1. Label the flower, the leaf and the roots first. Then try the stem and the seed pod.
Notes for Parents and Teachers
Show notes for parents and teachers
These notes cover this lesson only. How every lesson runs is explained in How to Use This Material.
Let’s Learn
If you have a real plant, point to each part as you read the table.
See How It’s Done
Trace each label line with your finger as you go through Kit’s thoughts.
Time To Practise
- Task 3: Check the learner’s work together, and tick each one you see.
Answer Key
Reveal Answers
Now Try It
1. The leaf
2. So the reader knows exactly which part the label names, even when parts are close together.
1. Labels
From the top left: flower, leaf, stem, roots. Top right: seed pod.
2. Captions
Sample answers:
roots: The roots hold the plant in the soil and take in water.
stem: The stem holds the plant up and carries water to the leaves.
leaf: The leaves use sunlight to make food for the plant.
flower: The flower attracts insects and makes seeds.
seed pod: The seed pod holds the new seeds.
3. Your diagram
Look for: four or more ticks.
Reflect
2. Any real moment from the lesson that shows the learner was a communicator. Examples: “I was a communicator today when I drew label lines that touched the right parts.” “I was a communicator today when I wrote captions to say what each part of a plant does.”
For Teachers: IB Details
Show IB and curriculum details
IB theme: How the world works. This theme is about the natural world and its laws: how living things grow and change, and how people find out about the world around them.
Central idea: Plants are living things that need the right conditions to grow, change and make new plants.
| Lesson | Title | Strand | Key concept |
|---|---|---|---|
| 4.7 | Read a Life Cycle Diagram | Viewing | Change |
| 4.8 | Draw a Labelled Plant Diagram | Viewing and presenting | Function |
Each lesson also matches the national curriculum for England (Year 2) and the US Common Core (Grade 2). The Grade 2 Curriculum Map lists the full standards for every lesson.
← Back to Lesson 4 – Plants and Growing | Lessons – Index
© 2026 Firefly Ed. All rights reserved. This page may be printed for personal, home and classroom use. It may not be sold, shared online or reproduced for commercial use without written permission. edfirefly.com


Share your thoughts or ask something..